深入理解 JUC:LinkedTransferQueue
上一篇我们分析了 SynchronousQueue 队列的设计与实现。在 SynchronousQueue 内部定义了一个 Transferer 抽象类,并继承该类基于 Dual Queue 和 Dual Stack 数据结构分别实现了 SynchronousQueue 的公平模式和非公平模式。本篇我们将要介绍的 LinkedTransferQueue 队列在设计思路上与 SynchronousQueue 的公平模式十分相似,二者在底层存储结构选型上都引入了 Dual Queue 数据结构。
LinkedTransferQueue 在 jdk 1.7 被引入,是一个基于 Dual Queue 数据结构实现的无界线程安全队列,其作者 Doug Lea 描述 LinkedTransferQueue 从功能上来说是 ConcurrentLinkedQueue、SynchronousQueue(公平模式),以及 LinkedBlockingQueue 的超集,并且更加实用和高效。
下面的章节我们将一起来分析 LinkedTransferQueue 的设计与实现,不过在开始之前还是需要先对两个名词做一下解释,即匹配和松弛度。
我们在上一篇介绍 SynchronousQueue 队列时已经解释了 匹配 的概念,这里再重复介绍一下。LinkedTransferQueue 在内部基于队列实现线程间的交互,以“生产者-消费者”为例,当生产者往 LinkedTransferQueue 中插入一个元素时,通常情况下该生产者线程在插入成功之后并不会立即返回,而是等待消费者前来消费。当消费者执行消费时发现队列上正好有生产者在等待,于是执行消费逻辑,也称为开始执行匹配进程,将当前消费者与生产者匹配成一对儿纷纷出队列。
匹配描述的是 Dual Queue 的运行机制,而 松弛度(slack) 则是一种优化策略。为了避免频繁移动队列的 head 和 tail 指针,作者引入了松弛度的概念,以度量 head 结点(或 tail 结点)与最近一个未匹配结点之间的距离。当一个结点被匹配(或取消,或插入)时,LinkedTransferQueue 并不会立即更新相应的 head 或 tail 指针,而是当松弛度大于指定阈值时才触发更新。这个阈值的取值范围一般设置在 1 到 3 之间,如果太大会降低有效结点命中率,增加遍历的长度,太小则会增加 CAS 的竞争和开销。
TransferQueue 接口
TransferQueue 接口在 JDK 1.7 被引入,用于描述一种全新的阻塞队列。LinkedTransferQueue 实现自 TransferQueue 接口,并且是目前(JDK 1.8)该接口的唯一实现类。TransferQueue 接口继承自 BlockingQueue 接口,由 BlockingQueue 描述的阻塞队列在队列为空或者已满时,相应的出队列线程或入队列线程会阻塞等待,而 TransferQueue 则更进一步。以入队列操作为例,当线程成功将元素添加到由 TransferQueue 描述的阻塞队列中后,该线程通常会一直阻塞直到某个出队列线程从队列中取走该入队列线程添加的元素。
TransferQueue 在 BlockingQueue 接口的基础上增加了以下方法:
1 | public interface TransferQueue<E> extends BlockingQueue<E> { |
针对各方法的含义说明如下:
transfer:生产者将元素直接传递给正在等待的消费者,而不执行入队列操作,如果没有正在等待的消费者则无限期等待,期间支持响应中断。tryTransfer:生产者将元素直接传递给正在等待的消费者,而不执行入队列操作,如果没有正在等待的消费者则返回 false,提供相应的超时版本。hasWaitingConsumer:检查是否存在正在等待的消费者。getWaitingConsumerCount:返回当前正在等待的消费者数目(近似值)。
由上述接口方法释义我们可以了解到,TransferQueue 系的队列支持在两个线程之间直接交换数据,而无需先将数据落地存储到队列中,如果确实需要落地,则线程可以随数据一起在队列上等待。
核心方法实现
LinkedTransferQueue 针对 BlockingQueue 和 TransferQueue 接口中声明的方法,在实现上均委托给 LinkedTransferQueue#xfer 方法执行,该方法也是本小节将要重点分析的方法。
在开始分析 LinkedTransferQueue#xfer 方法的实现之前,我们先介绍一下 LinkedTransferQueue 的基本字段定义。LinkedTransferQueue 基于 Dual Queue 作为底层存储结构,并定义了 Node 类描述 Dual Queue 上的结点,字段 LinkedTransferQueue#head 和 LinkedTransferQueue#tail 分别指向底层队列的头结点和尾结点。
Node 类的字段定义如下:
1 | static final class Node { |
LinkedTransferQueue 中的结点分为 数据结点 和 请求结点 两类,可以简单将数据结点理解为生产者结点,将请求结点理解为消费者结点。Node 类通过 Node#isData 字段标记一个结点是数据结点还是请求结点,并通过 Node#item 字段承载数据和标识对应结点的匹配状态。下表展示了数据结点和请求结点在匹配前后,字段 Node#item 的变化:
| 结点类型 | 数据结点 | 请求结点 |
|---|---|---|
| 匹配前 | isData = true; item != null | isData = false; item = null |
| 匹配后 | isData = true; item = null | isData = false; item = this |
注意:当一个结点被取消后,该结点的 Node#item 字段同样指向结点自己。
由上述表格我们可以设计一个判断结点是否已经匹配的方法,如下:
1 | // Node#isMatched |
如果一个结点的 item 字段指向自己(即 x == this),说明该结点被取消,或者对于请求结点而言,该结点已经被匹配,否则我们就可以继续执行 (x == null) == isData 进行判断,具体如下:
- 如果当前结点是数据结点(即
isData = true),如果该结点被匹配则结点的 item 应该为 null,所以满足(x == null) == isData。 - 如果当前结点是请求结点(即
isData = false),如果该结点被匹配则结点的 item 应该不为 null,所以满足(x == null) == isData。
接下来我们开始分析 LinkedTransferQueue#xfer 方法的实现,首先来看一下方法的参数定义,如下:
1 | private E xfer(E e, boolean haveData, int how, long nanos) { |
其中参数 e 表示待添加的元素值,如果是出队列操作,则为 null;参数 haveData 用于指定当前是入队列操作还是出队列操作,如果是入队列则 haveData 为 true,否则为 false;参数 how 对应当前的操作模式,分为:NOW、ASYNC、SYNC,以及 TIMED,如果是 TIMED 模式,则参数 nanos 用于指定当前等待的纳秒值。
下面进一步介绍一下 how 参数,我们知道 LinkedTransferQueue 的队列操作方法基本上都是直接委托给 LinkedTransferQueue#xfer 方法执行,而参数 how 则用于控制在不同调用场景下该方法的运行逻辑。LinkedTransferQueue 定义了 4 个 int 类型常量,分别表示不同的操作模式,如下:
1 | private static final int NOW = 0; // for untimed poll, tryTransfer |
针对各个模式的含义说明如下:
- NOW :当队列中没有匹配的结点时立即返回而不等待,例如当生产者执行入队列操作时,如果队列中没有正在等待的消费者则立即返回。
- ASYNC :当队列中没有匹配的结点时将元素入队列,但是当前线程本身并不等待而是立即返回,主要用于入队列操作。
- SYNC :当队列中没有匹配的结点时将元素入队列,并且当前线程会依附在对应结点上无限期等待。
- TIMED :当队列中没有匹配的结点时将元素入队列,并且当前线程会依附在对应结点上超时等待。
LinkedTransferQueue 实现的主要入队列和出队列方法在委托执行 LinkedTransferQueue#xfer 方法时的参数值设置如下表:
| 方法 | e | haveData | how | nanos |
|---|---|---|---|---|
LinkedTransferQueue#put |
e | true | ASYNC | 0 |
LinkedTransferQueue#add |
e | true | ASYNC | 0 |
LinkedTransferQueue#offer(E) |
e | true | ASYNC | 0 |
LinkedTransferQueue#offer(E, long, TimeUnit) |
e | true | ASYNC | 0 |
LinkedTransferQueue#take |
null | false | SYNC | 0 |
LinkedTransferQueue#poll() |
null | false | NOW | 0 |
LinkedTransferQueue#poll(long, TimeUnit) |
null | false | TIMED | timeout |
LinkedTransferQueue#transfer |
e | true | SYNC | 0 |
LinkedTransferQueue#tryTransfer(E) |
e | true | NOW | 0 |
LinkedTransferQueue#tryTransfer(E, long, TimeUnit) |
e | true | TIMED | timeout |
下面开始分析方法 LinkedTransferQueue#xfer 的实现,如下:
1 | private E xfer(E e, boolean haveData, int how, long nanos) { |
由上述实现可以看出,整个 LinkedTransferQueue#xfer 方法的执行分为 3 个阶段(已在代码中标出),针对各个阶段的说明作者在文档中已经给出了概述,这里直接摘录作者的原话:
- Try to match an existing node;
- Try to append a new node;
- Await match or cancellation.
也就是说当一个线程进入 LinkedTransferQueue#xfer 方法时,第 1 步会尝试在队列中寻找可以匹配的结点,如果存在则执行匹配操作;否则如果上游方法不期望立即返回(即不为 NOW 操作模式)则执行第 2 步,将当前元素添加到队列中;如果上游方法允许当前线程等待(即不为 ASYNC 操作模式),则进入等待状态,也就是第 3 步。
下面我们分步骤对这 3 个阶段逐一进行分析,首先来看 步骤 1 ,作者对这一步的详细概述摘录如下:
Try to match an existing node
Starting at head, skip already-matched nodes until finding an unmatched node of opposite mode, if one exists, in which case matching it and returning, also if necessary updating head to one past the matched node (or the node itself if the list has no other unmatched nodes). If the CAS misses, then a loop retries advancing head by two steps until either success or the slack is at most two. By requiring that each attempt advances head by two (if applicable), we ensure that the slack does not grow without bound. Traversals also check if the initial head is now off-list, in which case they start at the new head.
If no candidates are found and the call was untimed poll/offer, (argument “how” is NOW) return.
这一步的核心逻辑在于从队列中寻找可以匹配的结点,并执行匹配操作,具体执行流程概括为:
- 从队列头部开始遍历队列,寻找第一个未被取消且未被匹配的结点 p,如果存在则进入匹配进程;
- 校验结点 p 的模式是否与当前操作模式互补,如果相同则无法匹配,需要转而执行步骤 2,将当前结点添加到队列末端;
- 否则,基于 CAS 修改结点 p 的 item 值(如果是请求结点,则更新 item 为元素值 e;如果是数据结点,则更新 item 为 null),即执行匹配操作;
- 如果匹配失败,则说明存在其它线程先于完成了匹配操作,继续往后寻找下一个可以匹配的结点;
- 如果匹配成功,则尝试后移 head 指针,保证 head 结点的松弛度小于 2,并唤醒在匹配结点上阻塞的线程,最后返回本次匹配结点的 item 值。
下面利用图示演示上述执行流程,其中黄色表示消费者结点,青色表示生产者结点(M 表示已匹配,U 表示未匹配),红色表示当前匹配结点。假设当前操作是一个消费者线程,则从队列头部开始往后寻找第一个未被取消且未被匹配的结点,此时各指针的指向如下图 1 所示。在执行完几轮循环之后,当前线程在队列上找到了第一个可以匹配的结点 p,如下图 2 所示。然后执行匹配操作,基于 CAS 尝试将待匹配结点 p 的 item 值修改为 null,如下图 3 所示。
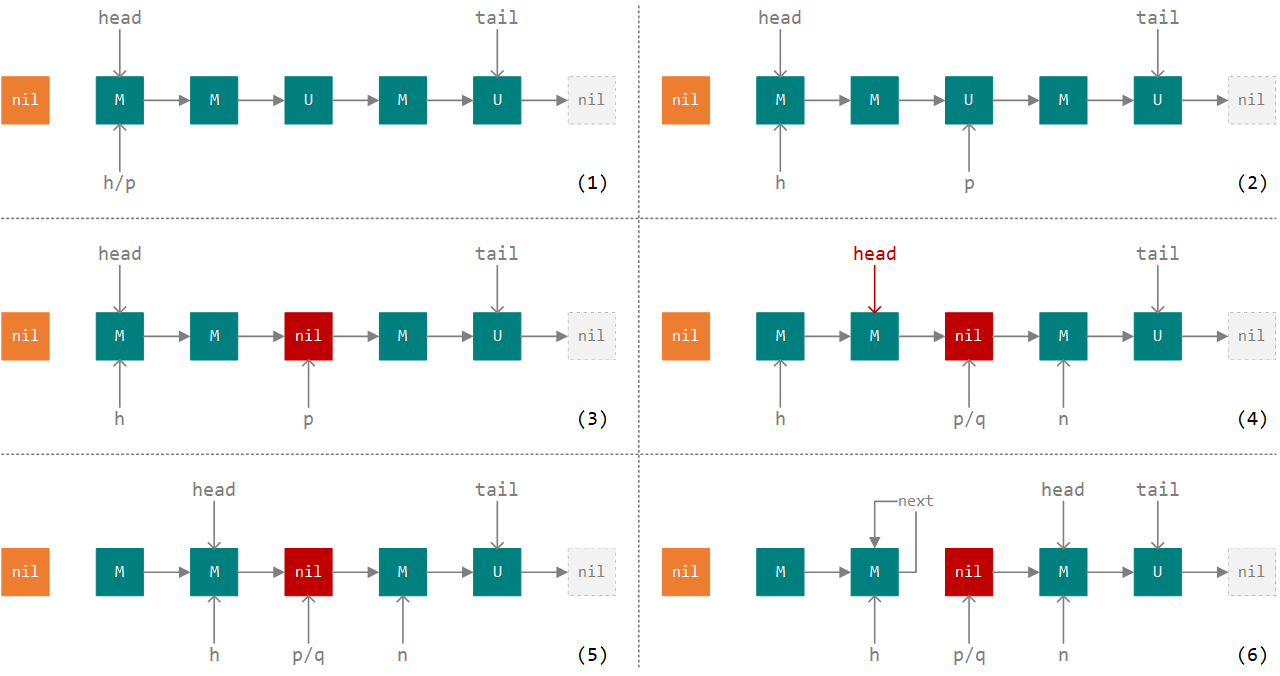
接下来线程会进入最内侧 for 循环,尝试后移 head 指针,以保证 head 结点的松弛度小于 2,如果期间正好有另外一个线程更新了 head 指针的指向,此时各指针的指向如上图 4 所示。此时 head 指针与 h 指针指向不同,所以继续执行最内侧 for 循环的第二个 if 判断,执行完后各个指针的指向如上图 5 所示。此时因为指针 q 所指向的结点已经完成匹配,所以继续进入下一轮最内侧 for 循环,此时满足最内侧 for 循环的第一个 if 判断,基于 CAS 更新 head 指针,并将之前 head 结点的 next 指针指向自己(自引用),等待 GC 回收,如上图 6 所示。最后唤醒在本次匹配结点上等待的线程,并返回。
如果上述步骤没有找到可以匹配的结点,则尝试为当前元素构造一个新的结点并插入到队列中,即执行 步骤 2 ,作者对这一步的详细概述摘录如下:
Try to append a new node
Starting at current tail pointer, find the actual last node and try to append a new node (or if head was null, establish the first node). Nodes can be appended only if their predecessors are either already matched or are of the same mode. If we detect otherwise, then a new node with opposite mode must have been appended during traversal, so we must restart at phase 1. The traversal and update steps are otherwise similar to phase 1: Retrying upon CAS misses and checking for staleness. In particular, if a self-link is encountered, then we can safely jump to a node on the list by continuing the traversal at current head.
On successful append, if the call was ASYNC, return.
如果当前操作模式为 NOW,则说明上游方法要求当队列中不存在可以匹配的结点时立即返回,则不执行本步骤,否则执行 LinkedTransferQueue#tryAppend 方法尝试将当前结点 s 入队列。该方法在执行失败的情况下会返回 null,否则返回新添加结点 s 的前驱结点,如果没有前驱结点则返回结点 s 自己。
方法 LinkedTransferQueue#tryAppend 的实现如下:
1 | private Node tryAppend(Node s, boolean haveData) { |
这一步的核心逻辑在于将结点 s 入队列,并在 tail 结点松弛度较大时后移 tail 指针。具体执行流程概括为:
- 如果队列为空,则直接将结点 s 入队列,并返回结点 s 对象;
- 否则,校验结点 s 能否入队列,如果前驱结点与结点 s 模式互补且未匹配,则不能入队列,此时直接返回 null 并退回步骤 1 开始执行;
- 如果结点 s 可以入队列,则寻找队列当前真正的 tail 结点,并将结点 s 作为后继结点入队列;
- 如果入队列失败,则说明前驱结点不是最新的队列 tail 结点,继续进入下一轮循环重试;
- 如果入队列成功,则判断 tail 结点的松弛度是否较大,如果较大则后移 tail 指针,以降低 tail 结点的松弛度。
下面利用图示演示上述执行流程。假设当前操作是一个生产者线程,期望向队列插入一个元素值为 5 的结点,并且队列中存在的都是未匹配的生产者结点,如下图 1 所示。此时队列不为空,且结点 s 可以入队列,此时各指针指向如下图 2 所示。因为结点 p 的 next 结点不为 null,说明 p 未指向最新的 tail 结点,需要后移 p、t 和 n 指针,直到 p 指向 tail 结点,如下图 3、4 和 5 所示。

接下来执行代码 4,基于 CAS 尝试将 p 结点的 next 结点由 null 更新为 s,即将结点 s 入队列,如上图 6 所示。如果入队列成功,则继续执行代码 5,后移 tail 指针,保证 tail 结点的松弛度小于 2,最后返回结点 s 的前驱结点,如上图 7 和 8 所示。
最后来看 步骤 3 ,作者对这一步的详细概述摘录如下:
Await match or cancellation
Wait for another thread to match node; instead cancelling if the current thread was interrupted or the wait timed out. On multiprocessors, we use front-of-queue spinning: If a node appears to be the first unmatched node in the queue, it spins a bit before blocking. In either case, before blocking it tries to unsplice any nodes between the current “head” and the first unmatched node.
Front-of-queue spinning vastly improves performance of heavily contended queues. And so long as it is relatively brief and “quiet”, spinning does not much impact performance of less-contended queues. During spins threads check their interrupt status and generate a thread-local random number to decide to occasionally perform a Thread.yield. While yield has underdefined specs, we assume that it might help, and will not hurt, in limiting impact of spinning on busy systems. We also use smaller (1/2) spins for nodes that are not known to be front but whose predecessors have not blocked – these “chained” spins avoid artifacts of front-of-queue rules which otherwise lead to alternating nodes spinning vs blocking. Further, front threads that represent phase changes (from data to request node or vice versa) compared to their predecessors receive additional chained spins, reflecting longer paths typically required to unblock threads during phase changes.
如果当前操作模式为 ASYNC,则说明上游方法要求线程在完成入队列操作之后不阻塞等待,而是立即返回。对于其它操作模式(除 NOW 和 ASYNC 以外)则需要执行 LinkedTransferQueue#awaitMatch 方法让当前线程依附在刚刚入队列的结点上等待。如果是 TIMED 操作模式,则执行超时等待,否则执行无限期等待,期间支持响应中断。
方法 LinkedTransferQueue#awaitMatch 实现如下:
1 | private E awaitMatch(Node s, Node pred, E e, boolean timed, long nanos) { |
可以看到在线程进入阻塞状态之前会先自旋几次,这样主要是为了提升 LinkedTransferQueue 在多核 CPU 上的性能,在入队列和出队列比较频繁的场景下避免线程不必要的阻塞和唤醒操作。上述方法的实现与上一篇介绍 SynchronousQueue 中的 TransferStack#awaitFulfill 方法的执行过程基本一致。
总结
本文我们分析了 LinkedTransferQueue 的设计与实现,LinkedTransferQueue 本质上是一个阻塞队列,但是相对于阻塞队列而言在阻塞语义上更进了一步,不仅仅在队列为空或已满时会触发线程阻塞,线程甚至会阻塞直到有其它线程取走或填充当前线程的元素值。此外,不同于一般的线程安全队列,LinkedTransferQueue 能够实现线程间的数据传递而无需先将数据入队列。
LinkedTransferQueue 在实现上基于 Dual Queue 数据结构,并基于 CAS 保证线程安全性。作者 Doug Lea 描述 LinkedTransferQueue 从功能上来说是 ConcurrentLinkedQueue、SynchronousQueue(公平模式)和 LinkedBlockingQueue 的超集,并且更加实用和高效。
不过尽管如此优秀,网上还是有人质疑 LinkedTransferQueue 存在数据暂失和导致 CPU 爆满的 bug,有兴趣的读者可以进一步研究一下。