Spring MVC 是目前最流行的 java web 框架(之一),是对传统 servlet 的高级封装,以提升 servlet 的灵活性和易用性。从广义上来说,Spring MVC 的执行过程可以分为 容器初始化 和 请求响应处理 两大部分,前者在 servlet 容器启动过程中完成,为后者的执行提供基本的运行环境,而后者则是 Spring MVC 的核心所在,负责接收请求到最终返回响应数据的复杂处理过程。
本篇章我们一起来探究 Spring MVC 在 web 环境下的容器初始化过程。Spring MVC 是建立在 Spring 基础组件之上的 MVC 框架,之前我们在分析 IoC 实现的时候,对于传统的容器初始化触发条件都是采用类似下面的方式:
1 ApplicationContext ac = new ClassPathXmlApplicationContext("spring-common.xml" );
Spring MVC 作为基于 IoC 的上层实现,同样也需要执行容器的初始化过程,熟悉使用 Spring MVC 框架的同学都知道在搭建基于 Spring MVC 的 web 项目时,都需要在 web.xml 中添加下面的配置:
1 2 3 4 5 6 7 8 9 10 11 12 13 14 15 16 17 18 19 20 21 22 23 <context-param > <param-name > contextConfigLocation</param-name > <param-value > classpath:spring-common.xml</param-value > </context-param > <listener > <listener-class > org.springframework.web.context.ContextLoaderListener</listener-class > </listener > <servlet > <servlet-name > spring_mvc</servlet-name > <servlet-class > org.springframework.web.servlet.DispatcherServlet</servlet-class > <init-param > <param-name > contextConfigLocation</param-name > <param-value > classpath:spring-mvc.xml</param-value > </init-param > <load-on-startup > 1</load-on-startup > </servlet > <servlet-mapping > <servlet-name > spring_mvc</servlet-name > <url-pattern > /</url-pattern > </servlet-mapping >
上述配置包含 ContextLoaderListener 和 DispatcherServlet 两部分,MVC 容器的初始化过程可以看做是这两个类的初始化过程。其中 ContextLoaderListener 是一个监听器,它实现了 ServletContextListener 接口:
1
2
3
4
5
6
7
public interface ServletContextListener extends EventListener public void contextInitialized (ServletContextEvent sce) public void contextDestroyed (ServletContextEvent sce) }
这两个方法分别在 servlet 容器启用和关闭时被调用。而 DispatcherServlet 则是一个标准的 servlet,可以看做是一个中央控制器,Spring MVC 基于该 servlet 处理所有的请求和响应。
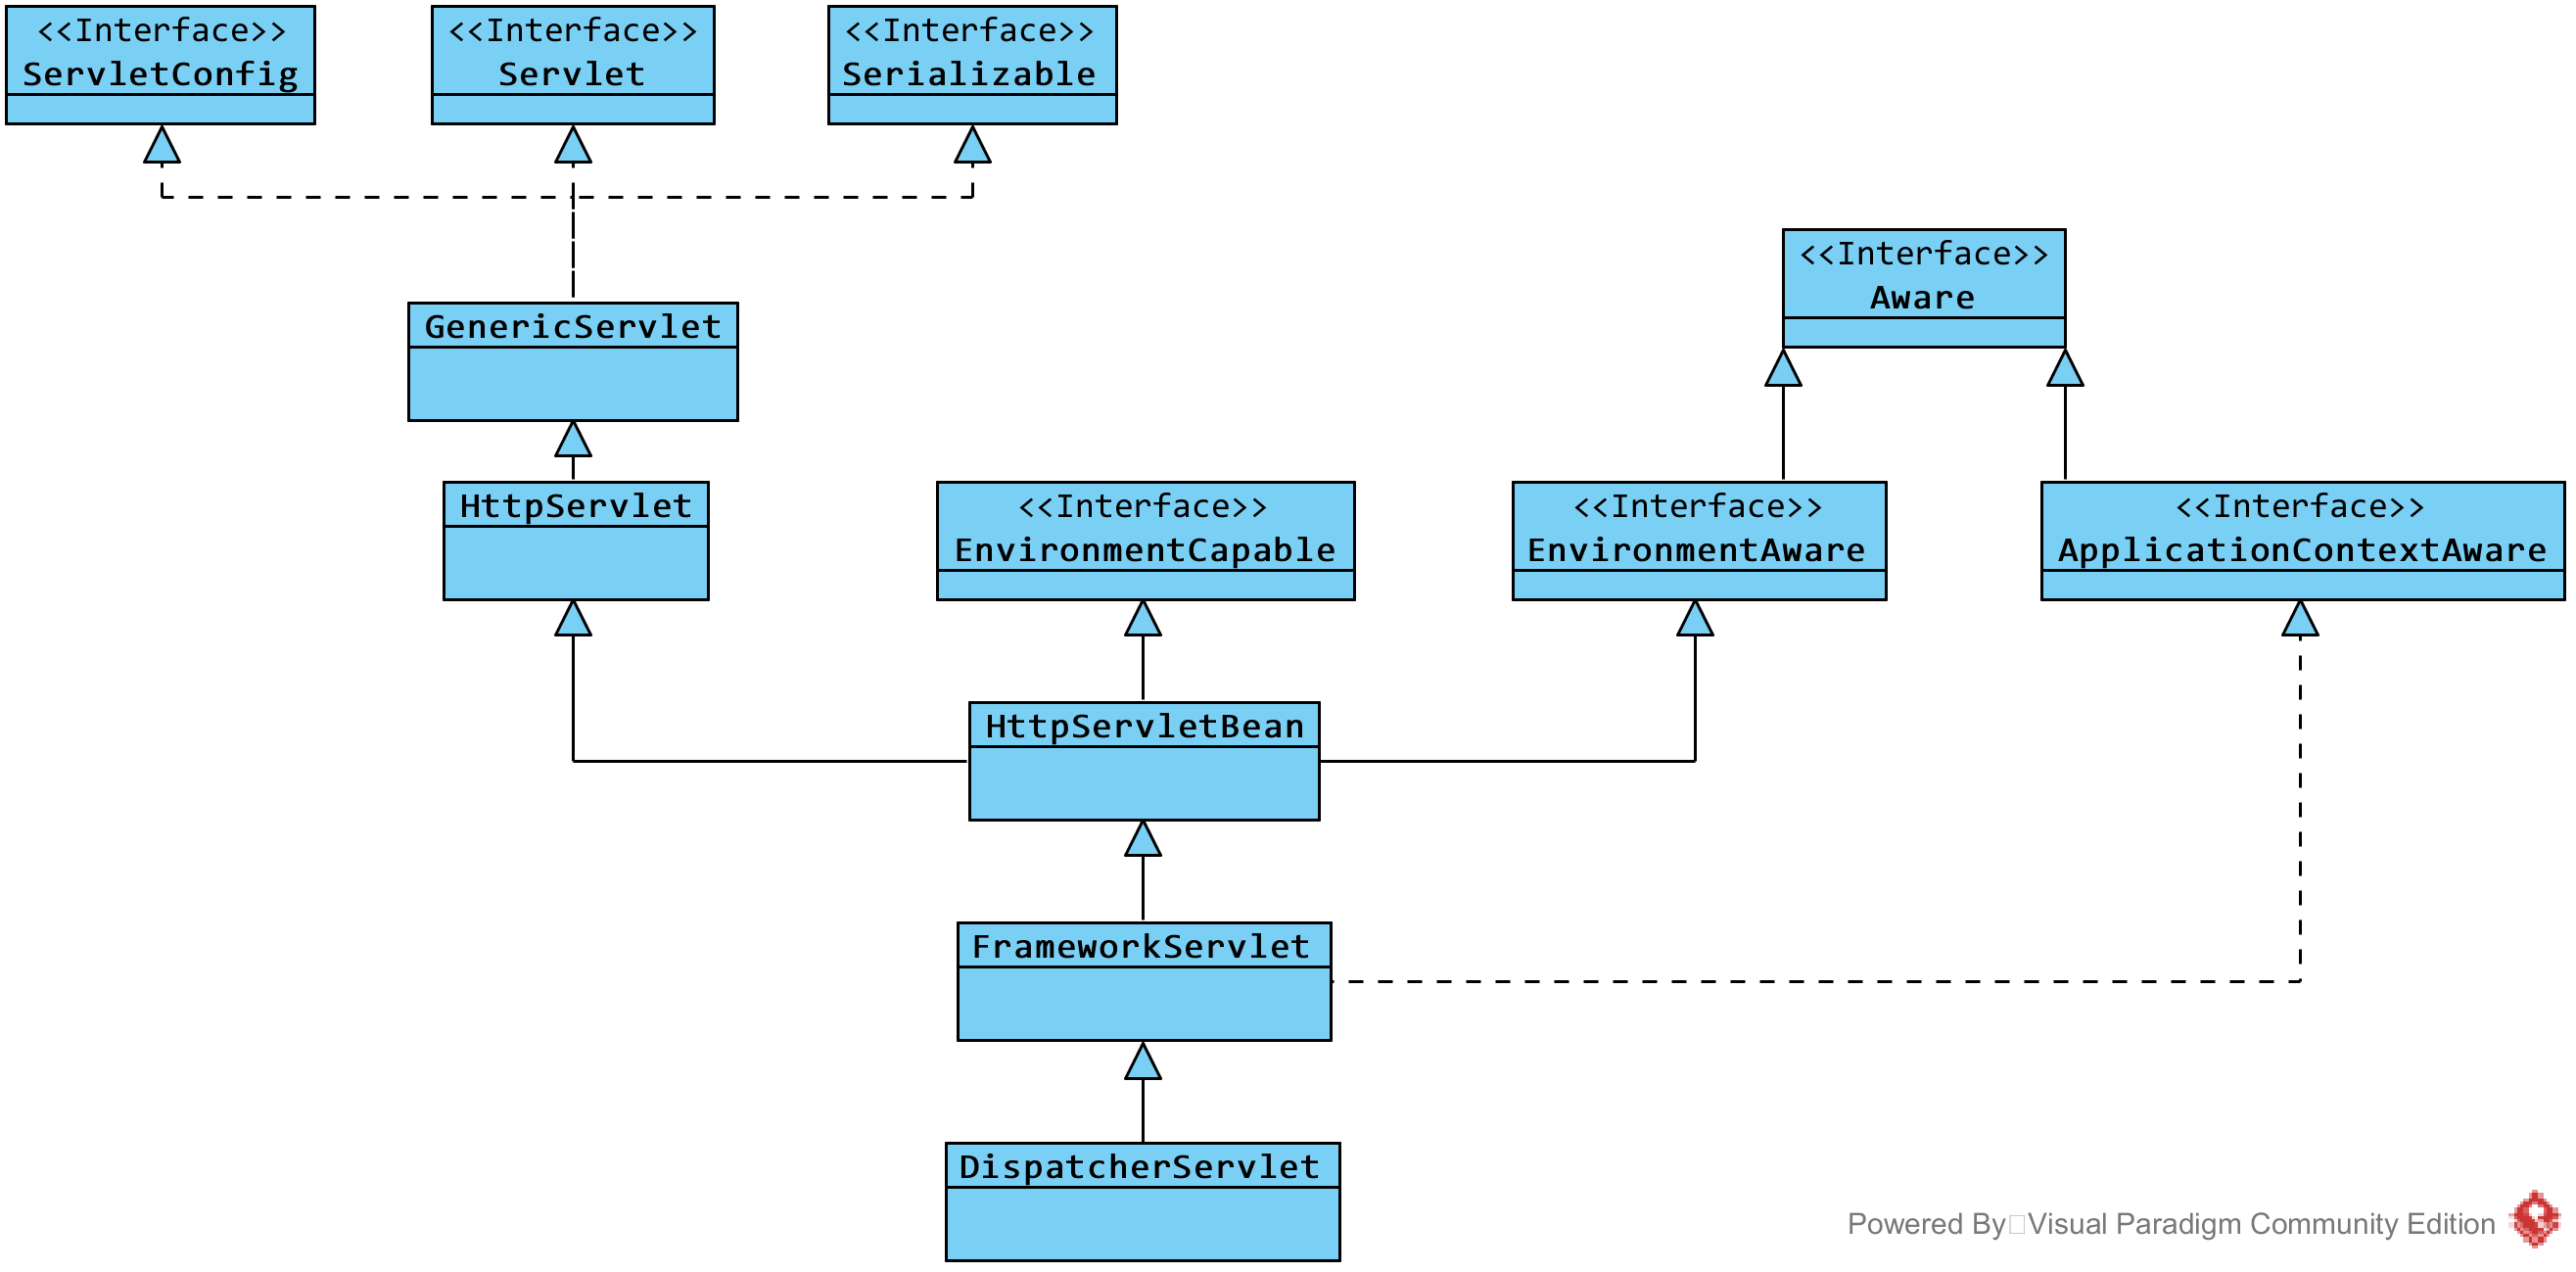
上图是 DispatcherServlet 的类继承关系图,其中左上角的 5 个接口(类)属于 jdk 中定义的接口(类),包括我们在基于原生 servlet 编写 web 程序时经常用到的 HttpServlet。
除此之外 HttpServletBean、FrameworkServlet,以及 DispatcherServlet 可以看做是整个继承体系中最核心的三个类,如果把 MVC 后面的处理逻辑看做是一个黑盒,那么这三个类中的逻辑可以看做是一个 “迎宾”,负责接待和送走 HTTP 请求。这些类实现了 Capable 和 Aware 接口,由前面我们对于 IoC 源码的分析可以知道,Capable 接口可以让目标类具备特定的能力,这里实现了 EnvironmentCapable 接口让目标类具备获取系统环境的能力,这里的环境主要是指 servlet 的初始化配置、JNDI 属性、系统环境变量,以及系统属性等信息;而 Aware 接口则能够让目标类拿到一定的资源,在容器初始化时会检测当前指定的 bean 是否实现了某个 Aware 接口,是的话就会将相应的资源注入到目标 bean 中。比如这里的 ApplicationContextAware 接口,实现了该接口的类容器会将应用上下文对象 ApplicationContext 对象注入到该类的实例中,从而能够持有容器的上下文。
ContextLoaderListener 的实现较为简单,他继承了 ContextLoader 类,并覆盖实现 ServletContextListener 接口中声明的方法,以达到在 servlet 容器启动和关闭时执行相应的初始化和清理操作,而这些操作的具体实现均位于 ContextLoader 类中:
1
2
3
4
5
6
7
8
9
10
11
12
13
14
15
16
17
18
19
20
21
22
23
24
25
26
27
28
public class ContextLoaderListener extends ContextLoader implements ServletContextListener public ContextLoaderListener () } public ContextLoaderListener (WebApplicationContext context) super (context); } @Override public void contextInitialized (ServletContextEvent event) this .initWebApplicationContext(event.getServletContext()); } @Override public void contextDestroyed (ServletContextEvent event) this .closeWebApplicationContext(event.getServletContext()); ContextCleanupListener.cleanupAttributes(event.getServletContext()); } }
初始化方法 contextInitialized(ServletContextEvent event) 中只是简单的调用了父类的方法 initWebApplicationContext(ServletContext servletContext) 以实现对 WebApplicationContext 上下文的初始化过程,这和我们通常手动 new 来触发 IoC 容器的初始化本质上是一样的,只不过这里是在 web 环境下,而 servlet 容器启动时是初始化 IoC 的最佳时机,所以 Spring 将这一过程基于 ServletContextListener 来实现也不难理解。
1
2
3
4
5
6
7
8
9
10
11
12
13
14
15
16
17
18
19
20
21
22
23
24
25
26
27
28
29
30
31
32
33
34
35
36
37
38
39
40
41
42
43
44
45
46
47
48
49
50
51
52
53
54
55
56
57
58
59
60
public WebApplicationContext initWebApplicationContext (ServletContext servletContext) if (servletContext.getAttribute(WebApplicationContext.ROOT_WEB_APPLICATION_CONTEXT_ATTRIBUTE) != null ) { throw new IllegalStateException( "Cannot initialize context because there is already a root application context present - check whether you have multiple ContextLoader* definitions in your web.xml!" ); } Log logger = LogFactory.getLog(ContextLoader.class); servletContext.log("Initializing Spring root WebApplicationContext" ); if (logger.isInfoEnabled()) { logger.info("Root WebApplicationContext: initialization started" ); } long startTime = System.currentTimeMillis(); try { if (this .context == null ) { this .context = this .createWebApplicationContext(servletContext); } if (this .context instanceof ConfigurableWebApplicationContext) { ConfigurableWebApplicationContext cwac = (ConfigurableWebApplicationContext) this .context; if (!cwac.isActive()) { if (cwac.getParent() == null ) { ApplicationContext parent = this .loadParentContext(servletContext); cwac.setParent(parent); } this .configureAndRefreshWebApplicationContext(cwac, servletContext); } } servletContext.setAttribute(WebApplicationContext.ROOT_WEB_APPLICATION_CONTEXT_ATTRIBUTE, this .context); ClassLoader ccl = Thread.currentThread().getContextClassLoader(); if (ccl == ContextLoader.class.getClassLoader()) { currentContext = this .context; } else if (ccl != null ) { currentContextPerThread.put(ccl, this .context); } if (logger.isDebugEnabled()) { logger.debug("Published root WebApplicationContext as ServletContext attribute with name [" + WebApplicationContext.ROOT_WEB_APPLICATION_CONTEXT_ATTRIBUTE + "]" ); } if (logger.isInfoEnabled()) { long elapsedTime = System.currentTimeMillis() - startTime; logger.info("Root WebApplicationContext: initialization completed in " + elapsedTime + " ms" ); } return this .context; } catch (RuntimeException ex) { logger.error("Context initialization failed" , ex); servletContext.setAttribute(WebApplicationContext.ROOT_WEB_APPLICATION_CONTEXT_ATTRIBUTE, ex); throw ex; } catch (Error err) { logger.error("Context initialization failed" , err); servletContext.setAttribute(WebApplicationContext.ROOT_WEB_APPLICATION_CONTEXT_ATTRIBUTE, err); throw err; } }
该方法的执行逻辑可以概括如下:
判断 ServletContext 对象中是否已经记录了 WebApplicationContext 对象,如果有记录则说明配置了不止一个 ContextLoaderListener,而这是不允许的
创建 WebApplicationContext 对象
如果 context 是 ConfigurableWebApplicationContext 类型,则有条件的进行配置和刷新应用上下文
将创建的 WebApplicationContext 对象记录到 ServletContext 中
容器的初始化过程执行一次即可,加载多次无益,所以 Spring MVC 会在 ServletContext 中记录已经创建的 WebApplicationContext 对象。我们来看一下该对象的创建过程:
1
2
3
4
5
6
7
8
9
10
protected WebApplicationContext createWebApplicationContext (ServletContext sc) Class<?> contextClass = this .determineContextClass(sc); if (!ConfigurableWebApplicationContext.class.isAssignableFrom(contextClass)) { throw new ApplicationContextException("Custom context class [" + contextClass.getName() + "] is not of type [" + ConfigurableWebApplicationContext.class.getName() + "]" ); } return (ConfigurableWebApplicationContext) BeanUtils.instantiateClass(contextClass); }
上述方法的核心在于决定具体创建的 WebApplicationContext 类型,该过程位于 determineContextClass(ServletContext servletContext) 方法中:
1
2
3
4
5
6
7
8
9
10
11
12
13
14
15
16
17
18
19
20
21
22
23
24
protected Class<?> determineContextClass(ServletContext servletContext) { String contextClassName = servletContext.getInitParameter(CONTEXT_CLASS_PARAM); if (contextClassName != null ) { try { return ClassUtils.forName(contextClassName, ClassUtils.getDefaultClassLoader()); } catch (ClassNotFoundException ex) { throw new ApplicationContextException("Failed to load custom context class [" + contextClassName + "]" , ex); } } else { contextClassName = defaultStrategies.getProperty(WebApplicationContext.class.getName()); try { return ClassUtils.forName(contextClassName, ContextLoader.class.getClassLoader()); } catch (ClassNotFoundException ex) { throw new ApplicationContextException("Failed to load default context class [" + contextClassName + "]" , ex); } } }
Spring MVC 允许我们利用 contextClass 属性来指定具体的 WebApplicationContext 类型(参考下面的配置),如果没有配置(一般我们都不会自定义配置)则 Spring MVC 会采用默认 XmlWebApplicationContext 作为具体的创建类型。
1 2 3 4 <context-param > <param-name > contextClass</param-name > <param-value > org.springframework.web.servlet.SimpleWebApplicationContext</param-value > </context-param >
而该默认配置位于 classpath 路径下的 ContextLoader.properties 文件中,配置内容为:
1 org.springframework.web.context.WebApplicationContext =org.springframework.web.context.support.XmlWebApplicationContext
Spring MVC 在 ContextLoader 的静态代码块中对该配置文件进行了加载,并记录到 defaultStrategies 属性中:
1
2
3
4
5
6
7
8
9
10
11
12
13
14
15
private static final Properties defaultStrategies;static { try { ClassPathResource resource = new ClassPathResource(DEFAULT_STRATEGIES_PATH, ContextLoader.class); defaultStrategies = PropertiesLoaderUtils.loadProperties(resource); } catch (IOException ex) { throw new IllegalStateException("Could not load 'ContextLoader.properties': " + ex.getMessage()); } }
需要注意的是该配置属于 Spring MVC 的内部配置,如果仅仅是使用 Spring MVC 框架则不建议开发者去更改默认配置值。
继续回来分析,如果创建的对象是 ConfigurableWebApplicationContext 类型(默认情况下即为该类型),则会判断当前的应用上下文对象是否执行过刷新且未被关闭,如果不满足则会执行刷新逻辑:
1
2
3
4
5
6
7
8
9
10
11
12
13
14
15
16
17
18
19
20
21
22
23
24
25
26
27
28
29
30
31
32
33
34
protected void configureAndRefreshWebApplicationContext (ConfigurableWebApplicationContext wac, ServletContext sc) if (ObjectUtils.identityToString(wac).equals(wac.getId())) { String idParam = sc.getInitParameter(CONTEXT_ID_PARAM); if (idParam != null ) { wac.setId(idParam); } else { wac.setId(ConfigurableWebApplicationContext.APPLICATION_CONTEXT_ID_PREFIX + ObjectUtils.getDisplayString(sc.getContextPath())); } } wac.setServletContext(sc); String configLocationParam = sc.getInitParameter(CONFIG_LOCATION_PARAM); if (configLocationParam != null ) { wac.setConfigLocation(configLocationParam); } ConfigurableEnvironment env = wac.getEnvironment(); if (env instanceof ConfigurableWebEnvironment) { ((ConfigurableWebEnvironment) env).initPropertySources(sc, null ); } this .customizeContext(sc, wac); wac.refresh(); }
整个方法执行过程已经注释的比较清楚,这里进一步说明一下其中不是特别直观的几个步骤。首先来看系统环境属性的初始化过程,一开始我们在描述 DispatcherServlet 的类继承关系时有提到 EnvironmentCapable 接口,而这里的 ConfigurableWebApplicationContext 也间接实现了该接口以获取系统的环境属性,这里的 Environment 实际使用的是 StandardServletEnvironment,而整个初始化过程也是将 ServletContext 和 ServletConfig 所持有的配置记录到 propertySources 属性中,这是一个 MutablePropertySources 类型。
再来看一下 customizeContext(ServletContext sc, ConfigurableWebApplicationContext wac) 方法,Spring MVC 中提供了 ApplicationContextInitializer 接口:
1
2
3
4
5
public interface ApplicationContextInitializer <C extends ConfigurableApplicationContext > void initialize (C applicationContext) }
我们可以通过实现该接口来对执行 refresh 前的应用上下文进行更改,只需要在 web.xml 中做类似下面这样的配置即可:
1 2 3 4 5 6 7 8 <context-param > <param-name > contextInitializerClasses</param-name > <param-value > org.zhenchao.spring.mvc.initializer.MyContextApplicationContextInitializer</param-value > </context-param > <context-param > <param-name > globalInitializerClasses</param-name > <param-value > org.zhenchao.spring.mvc.initializer.MyGlobalApplicationContextInitializer</param-value > </context-param >
而 contextInitializerClasses 和 globalInitializerClasses 的区别也正如其名,仅仅是作用范围不一样而已。我们可以同时配置多个实现类,多个类之间使用分号、逗号之类的分隔符进行分隔,而方法会将 contextInitializerClasses 和 globalInitializerClasses 的配置的所有实现类实例化存储到 List 集合中,并依次调用各个实现类的 initialize 对传入的应用上下文对象执行初始化操作。
最后,和普通高级 IoC 容器一样,方法调用了 ApplicationContext 的 refresh 方法,开始执行对高级容器的初始化策略,而这一部分的详细过程可以参考之前对高级容器初始化过程进行专门分析的篇章 。
DispatcherServlet 本质上是一个 servlet,Spring MVC 对于请求的接收和响应都是基于该 servlet 实现,所以 DispatcherServlet 可以看做是 Spring MVC 中最核心的一个类,后面我们会对请求的具体处理过程进行专门分析,而这里我们把注意力主要集中在其初始化过程上。我们先来回忆一下 servlet 接口定义,如下:
1
2
3
4
5
6
7
8
9
10
11
12
public interface Servlet public void init (ServletConfig config) throws ServletException public ServletConfig getServletConfig () public void service (ServletRequest req, ServletResponse res) throws ServletException, IOException public String getServletInfo () public void destroy () }
当一个 servlet 被加载时会首先执行 init(ServletConfig config) 方法,而 DispatcherServlet 的 init 方法位于父类 HttpServletBean 中:
1
2
3
4
5
6
7
8
9
10
11
12
13
14
15
16
17
18
19
20
21
22
23
24
25
26
27
28
29
30
31
public final void init () throws ServletException if (logger.isDebugEnabled()) { logger.debug("Initializing servlet '" + getServletName() + "'" ); } try { PropertyValues pvs = new ServletConfigPropertyValues(this .getServletConfig(), this .requiredProperties); BeanWrapper bw = PropertyAccessorFactory.forBeanPropertyAccess(this ); ResourceLoader resourceLoader = new ServletContextResourceLoader(this .getServletContext()); bw.registerCustomEditor(Resource.class, new ResourceEditor(resourceLoader, getEnvironment())); this .initBeanWrapper(bw); bw.setPropertyValues(pvs, true ); } catch (BeansException ex) { if (logger.isErrorEnabled()) { logger.error("Failed to set bean properties on servlet '" + getServletName() + "'" , ex); } throw ex; } this .initServletBean(); if (logger.isDebugEnabled()) { logger.debug("Servlet '" + getServletName() + "' configured successfully" ); } }
该初始化方法并没有做太多核心逻辑,它的主要功能就是将我们配置的 servlet 初始化参数,以及当前 servlet 对象封装成 Spring 所习惯的方式(不理解的话可以去看一下前面 IoC 的实现),而核心初始化过程则位于 FrameworkServlet 所覆盖实现的 initServletBean() 方法中:
1
2
3
4
5
6
7
8
9
10
11
12
13
14
15
16
17
18
19
20
21
22
23
24
25
protected final void initServletBean () throws ServletException this .getServletContext().log("Initializing Spring FrameworkServlet '" + getServletName() + "'" ); if (this .logger.isInfoEnabled()) { this .logger.info("FrameworkServlet '" + getServletName() + "': initialization started" ); } long startTime = System.currentTimeMillis(); try { this .webApplicationContext = this .initWebApplicationContext(); this .initFrameworkServlet(); } catch (ServletException ex) { this .logger.error("Context initialization failed" , ex); throw ex; } catch (RuntimeException ex) { this .logger.error("Context initialization failed" , ex); throw ex; } if (this .logger.isInfoEnabled()) { long elapsedTime = System.currentTimeMillis() - startTime; this .logger.info("FrameworkServlet '" + getServletName() + "': initialization completed in " + elapsedTime + " ms" ); } }
上述方法的核心在于调用了 initWebApplicationContext() 方法:
1
2
3
4
5
6
7
8
9
10
11
12
13
14
15
16
17
18
19
20
21
22
23
24
25
26
27
28
29
30
31
32
33
34
35
36
37
38
39
40
41
42
43
44
45
46
47
48
49
protected WebApplicationContext initWebApplicationContext () WebApplicationContext rootContext = WebApplicationContextUtils.getWebApplicationContext(this .getServletContext()); WebApplicationContext wac = null ; if (this .webApplicationContext != null ) { wac = this .webApplicationContext; if (wac instanceof ConfigurableWebApplicationContext) { ConfigurableWebApplicationContext cwac = (ConfigurableWebApplicationContext) wac; if (!cwac.isActive()) { if (cwac.getParent() == null ) { cwac.setParent(rootContext); } this .configureAndRefreshWebApplicationContext(cwac); } } } if (wac == null ) { wac = this .findWebApplicationContext(); } if (wac == null ) { wac = this .createWebApplicationContext(rootContext); } if (!this .refreshEventReceived) { this .onRefresh(wac); } if (this .publishContext) { String attrName = this .getServletContextAttributeName(); this .getServletContext().setAttribute(attrName, wac); if (this .logger.isDebugEnabled()) { this .logger.debug("Published WebApplicationContext of servlet '" + getServletName() + "' as ServletContext attribute with name [" + attrName + "]" ); } } return wac; }
该方法的执行逻辑概括如下:
获取在 ContextLoaderListener 初始化时创建的应用上下文对象作为父容器
依次从构造注入、ServletContext 属性中检测是否有已经创建的 WebApplicationContext 的对象,如果未找到则创建一个
有条件执行 onRefresh 逻辑
有条件记录 WebApplicationContext 对象到 ServletContext 中
整个逻辑还是很清晰的,我们进一步探究各个过程,先跳过第 1 个步骤,等分析完后面几个步骤之后,我们再回过来思考这一步的意义。
首先方法会检测是否有在构造对象时注入了 WebApplicationContext 对象,如果有的话则判断是否是 ConfigurableWebApplicationContext 类型,如果是则执行相应的刷新逻辑:
1
2
3
4
5
6
7
8
9
10
11
12
13
14
15
16
17
18
19
20
21
22
23
24
25
26
27
28
29
30
31
32
33
protected void configureAndRefreshWebApplicationContext (ConfigurableWebApplicationContext wac) if (ObjectUtils.identityToString(wac).equals(wac.getId())) { if (this .contextId != null ) { wac.setId(this .contextId); } else { wac.setId(ConfigurableWebApplicationContext.APPLICATION_CONTEXT_ID_PREFIX + ObjectUtils.getDisplayString(getServletContext().getContextPath()) + '/' + getServletName()); } } wac.setServletContext(this .getServletContext()); wac.setServletConfig(this .getServletConfig()); wac.setNamespace(this .getNamespace()); wac.addApplicationListener(new SourceFilteringListener(wac, new ContextRefreshListener())); ConfigurableEnvironment env = wac.getEnvironment(); if (env instanceof ConfigurableWebEnvironment) { ((ConfigurableWebEnvironment) env).initPropertySources(this .getServletContext(), this .getServletConfig()); } this .postProcessWebApplicationContext(wac); this .applyInitializers(wac); wac.refresh(); }
是不是很眼熟?实际上该方法与前面分析 ContextLoaderListener 初始化过程中的 ContextLoader#configureAndRefreshWebApplicationContext 方法在逻辑上相差无几。
如果没有在构造对象时注入,则会继续在 ServletContext 中寻找,因为一般会将创建的 WebApplicationContext 对象记录到 ServletContext 的 attribute 中。再不然就会执行创建逻辑主动创建一个:
1
2
3
4
5
6
7
8
9
10
11
12
13
14
15
16
17
18
19
20
21
22
23
protected WebApplicationContext createWebApplicationContext (ApplicationContext parent) Class<?> contextClass = this .getContextClass(); if (this .logger.isDebugEnabled()) { this .logger.debug("Servlet with name '" + getServletName() + "' will try to create custom WebApplicationContext context of class '" + contextClass.getName() + "'" + ", using parent context [" + parent + "]" ); } if (!ConfigurableWebApplicationContext.class.isAssignableFrom(contextClass)) { throw new ApplicationContextException("Fatal initialization error in servlet with name '" + getServletName() + "': custom WebApplicationContext class [" + contextClass.getName() + "] is not of type ConfigurableWebApplicationContext" ); } ConfigurableWebApplicationContext wac = (ConfigurableWebApplicationContext) BeanUtils.instantiateClass(contextClass); wac.setEnvironment(this .getEnvironment()); wac.setParent(parent); wac.setConfigLocation(this .getContextConfigLocation()); this .configureAndRefreshWebApplicationContext(wac); return wac; }
方法执行逻辑已注释的比较清楚,不再多做撰述。
接下来将会判断 refreshEventReceived 是否为 false (默认为 false,该属性会在 FrameworkServlet#onApplicationEvent 中被置为 true,以防止重复执行 onRefresh() 逻辑),如果是的话则执行 onRefresh() 逻辑,这是一个模板方法,DispatcherServlet 对其进行了覆盖实现:
1
2
3
4
@Override protected void onRefresh (ApplicationContext context) this .initStrategies(context); }
1
2
3
4
5
6
7
8
9
10
11
12
13
14
15
16
17
18
19
20
21
22
23
24
25
protected void initStrategies (ApplicationContext context) this .initMultipartResolver(context); this .initLocaleResolver(context); this .initThemeResolver(context); this .initHandlerMappings(context); this .initHandlerAdapters(context); this .initHandlerExceptionResolvers(context); this .initRequestToViewNameTranslator(context); this .initViewResolvers(context); this .initFlashMapManager(context); }
该方法完成了对 Spring MVC 中核心支持类的初始化过程,关于各解析器的具体功能先不展开,后续会用专门的篇章进行讲解。上述过程调用了 9 个方法分别对各类型解析器执行初始化,这 9 个方法除了第一个 MultipartResolver 之外,其余方法的执行逻辑基本相同,可以概括为调用 getBean 方法从容器中去获取自定义的 bean,如果不存在这采用默认的 bean 代替,我们以其中一个方法 initLocaleResolver 来展开说明,该方法用于初始化本地化支持解析器:
1
2
3
4
5
6
7
8
9
10
11
12
13
14
15
private void initLocaleResolver (ApplicationContext context) try { this .localeResolver = context.getBean(LOCALE_RESOLVER_BEAN_NAME, LocaleResolver.class); if (logger.isDebugEnabled()) { logger.debug("Using LocaleResolver [" + this .localeResolver + "]" ); } } catch (NoSuchBeanDefinitionException ex) { this .localeResolver = this .getDefaultStrategy(context, LocaleResolver.class); if (logger.isDebugEnabled()) { logger.debug("Unable to locate LocaleResolver with name '" + LOCALE_RESOLVER_BEAN_NAME + "': using default [" + this .localeResolver + "]" ); } } }
方法首先会从容器中获取约定的名为 “localeResolver” 的 bean,如果不存在则从 defaultStrategies 属性中获取默认配置的解析器,该属性位于 DispatcherServlet 中,并在静态代码块中完成初始化:
1
2
3
4
5
6
7
8
9
static { try { ClassPathResource resource = new ClassPathResource(DEFAULT_STRATEGIES_PATH, DispatcherServlet.class); defaultStrategies = PropertiesLoaderUtils.loadProperties(resource); } catch (IOException ex) { throw new IllegalStateException("Could not load 'DispatcherServlet.properties': " + ex.getMessage()); } }
这与之前 ContextLoader 中 WebApplicationContext 的默认配置和加载策略思想相同,DispatcherServlet.properties 配置文件中包含了上述 9 个方法中除第 1 个方法外的 8 类解析器的默认配置:
1 2 3 4 5 6 7 8 9 10 11 12 13 14 15 16 17 18 19 20 21 22 23 24 25 26 27 28 29 30 org.springframework.web.servlet.LocaleResolver =org.springframework.web.servlet.i18n.AcceptHeaderLocaleResolver org.springframework.web.servlet.ThemeResolver =org.springframework.web.servlet.theme.FixedThemeResolver org.springframework.web.servlet.HandlerMapping =org.springframework.web.servlet.handler.BeanNameUrlHandlerMapping,\ org.springframework.web.servlet.mvc.annotation.DefaultAnnotationHandlerMapping org.springframework.web.servlet.HandlerAdapter =org.springframework.web.servlet.mvc.HttpRequestHandlerAdapter,\ org.springframework.web.servlet.mvc.SimpleControllerHandlerAdapter,\ org.springframework.web.servlet.mvc.annotation.AnnotationMethodHandlerAdapter org.springframework.web.servlet.HandlerExceptionResolver =org.springframework.web.servlet.mvc.annotation.AnnotationMethodHandlerExceptionResolver,\ org.springframework.web.servlet.mvc.annotation.ResponseStatusExceptionResolver,\ org.springframework.web.servlet.mvc.support.DefaultHandlerExceptionResolver org.springframework.web.servlet.RequestToViewNameTranslator =org.springframework.web.servlet.view.DefaultRequestToViewNameTranslator org.springframework.web.servlet.ViewResolver =org.springframework.web.servlet.view.InternalResourceViewResolver org.springframework.web.servlet.FlashMapManager =org.springframework.web.servlet.support.SessionFlashMapManager
那么为什么单单就 MultipartResolver 没有默认配置呢?这得联想一下 MultipartResolver 的功能,该解析器主要用于文件上传,这是一个基础但又小众的需求,所以没有必要为所有系统都添加默认的上传请求处理器,很多时候这样的设计是对资源的一种浪费。执行完所有解析器的初始化过程之后,接下来的逻辑就是有条件的将获取到的 WebApplicationContext 对象记录到 ServletContext 对象中,以备在后续需要用到时能够简单的获取。
说到这里我们再回头来看看第一步中的获取在初始化 ContextLoaderServlet 时创建的应用上下文对象。不知道您在阅读这两个组件的初始化的时候有没有这样的疑问,感觉两个组件的初始化过程重复度很高,Spring MVC 为什么要将其拆分成两个过程来实现?这两个过程的初始化是否存在覆盖呢?如果您看过之前我分析 IoC 容器基本结构设计的文章可能还记得下面这样一段话:
HierarchicalBeanFactory 译为中文是“分层的”,它相对于 BeanFactory 增加了对父 BeanFactory 的获取,子容器可以通过接口方法访问父容器,让容器的设计具备了层次性。这种层次性增强了容器的扩展性和灵活性,我们可以通过编程的方式为一个已有的容器添加一个或多个子容器,从而实现一些特殊功能。层次容器有一个特点就是子容器对于父容器来说是透明的,而子容器则能感知到父容器的存在。
Spring MVC 容器的设计就是分层容器的典型应用场景,我们在配置 ContextLoaderListener 时,会指定 Spring 的一般配置文件,这其中包含 service 层、dao 层,以及一般业务类 bean 的配置,而在配置 DispatcherServlet 时则会指定 mvc 的配置文件,这其中主要是 web 层的相关配置。
上述初始化过程先执行 ContextLoaderListener 的初始化,并将初始化返回的应用上下文对象设置为 DispatcherServlet 初始化过程创建的应用上下文对象的父容器。参考分层容器的隔离规则,这样的设计能够保证 web 层的 bean 能够访问 service 层等低层次的 bean,而反之则无法访问,从而在容器层面支持友好的系统结构分层 。所以说整个初始化过程虽然在执行过程上有一定的冗余度,但确实创建的是两套上下文环境,并且这两套环境具备父子层次关系,希望这样的解释能够让你解惑。
Web 环境下容器的初始化过程就分析到这里,后续的文章我们将继续探究 MVC 的核心逻辑,看看请求是如何一步步被 Spring MVC 所处理和响应的。